
Our garage had become a black hole. Tools, holiday decorations, paint leftovers, and random junk piled up so bad I could barely get the car in without playing Tetris. Old wire shelving units from years ago were sagging and rusty. I looked at nice heavy-duty metal prefab racks at the big box stores — easily $300-$500 per set for what I needed. Instead, I spent a weekend building two full walls of custom shelving using mostly scrap 2x4s and OSB I already had, plus $80 in fresh lumber for the main uprights. Total game-changer. The garage is functional again.
Planning the Build
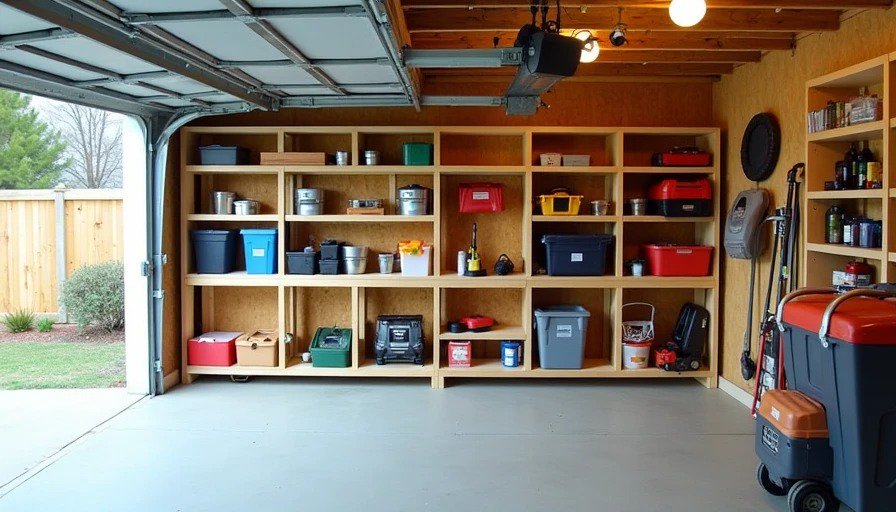
I measured the available wall space: two 12-foot walls, floor to about 7 feet high to leave room for overhead storage later. Decided on three levels per section — bottom for heavy stuff, middle for bins, top for lighter items. Depth around 24 inches — deep enough for storage without sticking out too far into the garage.
Design goals: Strong (garage stuff gets heavy), cheap, and easy to build with basic tools. No fancy joinery — just screws and basic framing.

Materials – Keeping It Cheap
New 2x4s for uprights and some framing: about $80 at HD (treated for bottom if moisture is an issue, but mine was dry)
Scrap 2x4s for ledgers and cross braces from previous projects
OSB sheets (leftover from shed build) cut to size for shelves
3" construction screws, some brackets for extra support
Basic paint or sealer if wanted (skipped for now)
Prefab equivalents: A single heavy-duty 5-shelf unit often runs $150-300. Two walls worth would easily hit $600-$1,000 installed. My version: $80 cash outlay.
Cost Comparison (2026-ish Numbers)
Option | Cost per Unit/Wall | Total for My Setup | Durability Notes |
|---|---|---|---|
Prefab Metal Racks | $250-500 | $600-1,200+ | Good but pricey |
My Custom Wood Build | $40-80 | $80 | Very strong, customizable |
Store-Bought Wood Kits | $150-300 | $400+ | Easier but less heavy-duty |
Wood is forgiving and I could make it exactly fit the space.
The Build Process – One Weekend
Day 1: Framing
Leveled the floor area. Installed vertical 2x4 uprights every 4 feet, anchored to the wall studs with heavy screws (found studs with a magnet). Added horizontal ledger boards for shelf support. Cross-braced the uprights for stability — critical for heavy loads.
Day 2: Shelves and Finish
Cut OSB to fit, rested on the ledgers, and screwed down securely. Added a front lip on deeper shelves to prevent stuff from falling. Total time: maybe 12-14 hours including breaks and figuring things out as I went. Not bad for a solo project.
I didn’t bother with fancy finishes. Raw wood works fine in the garage. If I had more time I’d paint it for moisture resistance.
Tools Needed
Circular saw or miter saw for cuts
Cordless drill/driver
Level (laser helps but bubble works)
Stud finder
Measuring tape, pencil
Safety gear — gloves, glasses
Basic homeowner stuff. No advanced carpentry skills required.

Why This Beats Prefab Racks
Strength: 2x4 framing handles hundreds of pounds per shelf easily. My paint cans, tool chests, and bins are secure.
Customization: Perfect fit to the weird garage wall with outlets and switches. Prefab often wastes space.
Cost: Massive savings. Materials I already had made it even cheaper.
Repairability: If something breaks, I fix it with scraps instead of ordering parts.
Look: Industrial and honest. Doesn’t pretend to be fancy.
Downsides: Heavier to build initially, takes more time than assembling prefab. But worth it.
Lessons and Tips:
Always anchor to studs — don’t rely on drywall anchors for heavy storage.
Slope shelves slightly if moisture is a concern (mine aren’t).
Leave space between shelves for bulky items.
Consider adding wheels to one section if you want mobility.
Overbuild a bit — better than sagging later.
Check local codes if it’s a finished garage, but for basic storage, usually fine.
I’ve seen garages with fancy systems costing thousands. This does 90% of the job for pennies.
Results After Several Months
The garage is transformed. I can park both cars when needed, find tools quickly, and the space feels bigger. No more tripping over junk. Friends have asked for the “plan” — it’s simple: measure, frame, shelf.
This project paid for itself fast by protecting tools from damage and freeing up floor space. Small wins like this keep the fixer-upper spirit alive without breaking the bank.
Bigger Picture on Garage Organization
Garages eat money if not organized — lost tools, duplicate buys, water damage to stuff on the floor. A solid shelving system is one of the highest ROI home projects. You don’t need Instagram-perfect — functional beats pretty every time in the garage.
If your walls are bare or you have scrap wood, do this. Total beginner friendly with a bit of planning.
What’s your go-to cheap garage storage solution? Built something from pallets or scrap? Bought prefab and regretted the price? Drop your costs and photos in your mind — what worked and what didn’t? This forum thrives on real builds, not catalog dreams. Anyone try heavier-duty versions with 2x6s?